From managing clients and scheduling meetings to keeping projects on track, email is often where the magic (and chaos!) of your day happens.
If your inbox is overflowing with unread messages, it might be the perfect time to bring in a virtual assistant to help get things under control.
Both Gmail and Outlook offer secure ways to share access to your inbox without having to hand over your password. You get to choose what your assistant can and can’t do, so you stay in control and can easily review their work.
Keep reading to find out how you can set up your Gmail and Outlook delegate access and reclaim your valuable time!
What are the benefits of delegating email management?
Let’s be real—email can be a beast. If your inbox is always full, it’s easy to feel overwhelmed and stressed out. But what if you didn’t have to handle it all by yourself?
Delegating your email management to a virtual assistant can be a total game changer for your productivity, peace of mind, and even your work-life balance. Here’s why:
Save time and increase productivity
Did you know the average person receives about 121 emails a day? As a business owner, that number is likely even higher.
This means that our inboxes are probably one of the biggest sources of distraction. Each time email notifications flash on your screen, it’s easy to get sidetracked and lose valuable time.
So, it's hardly surprising to hear that McKinsey Global Institute found that people spend about 28% of their workweek just reading and replying to emails. But here's the kicker: the same report found that only 38% of emails in the average inbox are actually important or relevant.
To put this in perspective, this means you might be losing around five hours each week—or 30 working days a year—on emails that don't matter.
Giving a virtual assistant access to your inbox to triage your email messages can help you cut those wasted hours all the way down.
Reduce stress and improve work-life balance
Regardless of your role, waking up and seeing hundreds of unread emails in your inbox is a surefire way to get your day off to a stressful start. In fact, about 92% of people experience increases in blood pressure and heart rate when they open their work inbox.
But it’s not just the sheer number of emails that weighs us down—it’s the constant pressure to respond, even during off-hours, that can really take a toll. A 2016 study found that the expectation to be “always-on” can have serious consequences for your work-life balance and personal well-being.
The good news? Delegating your email management can lift that heavy load off your shoulders. Virtual assistants can help you cut through the noise, keep everything neat and organized, and even respond to some messages on your behalf to make sure nothing slips through the cracks.
Enhance focus on high-priority tasks
As a business owner, there are some things only you can do. With a virtual assistant in your corner, you can make sure your attention stays where it’s needed most.
Instead of getting bogged down by every email, you’ll only be notified about the ones that truly require your attention, while routine or low-priority messages are managed behind the scenes. This frees you up to focus on strategic decisions, client meetings, and growing your business—without the constant interruptions from non-essential emails.
How to share access to your Gmail account
So now that we've covered how delegating email management to a virtual assistant can have numerous benefits for your productivity, stress levels, and work-life balance, it's time to get started!
Gmail makes it easy to get a helping hand with your inbox by letting you delegate mailbox access to your assistant. This means they can read and respond to your emails for you, without needing your password. It’s a secure way to share access and keep your account safe.
Here’s a simple guide to setting up Gmail delegation access:
- Log into your Gmail account
- Go to the 'Settings' option
- Click on the 'Accounts' tab
- Select the 'Add another account' option
- Enter your assistant's email address
- Click 'Send email to grant access'
- Your assistant confirms the request
Step 1. Log into your Gmail account
Start by logging into your Gmail account from a desktop computer, as you can’t set up delegation from the Gmail app.
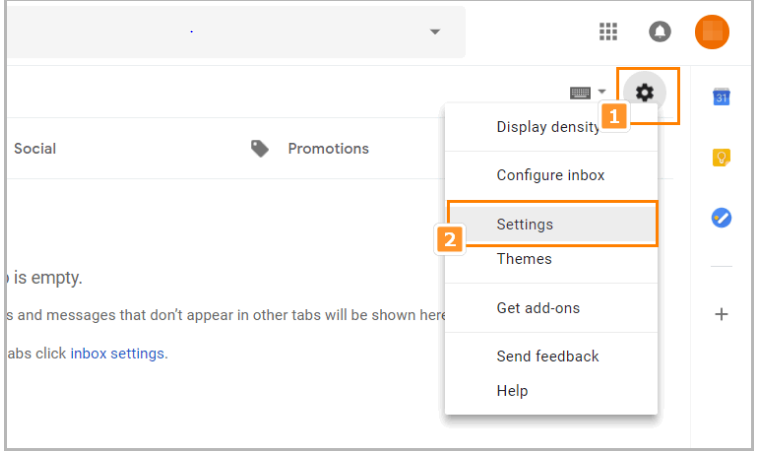
Step 2. Go to the 'Settings' option
Once you're logged in, click on the ‘Settings’ icon—it's usually shaped like a gear.
Source
Step 3. Click on the 'Accounts' tab
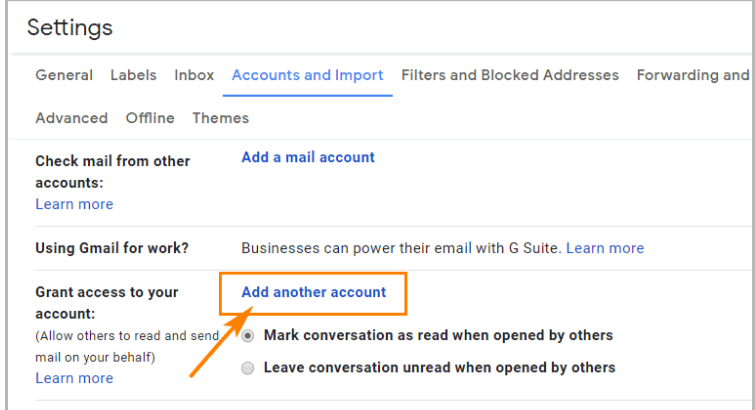
In the new window that opens, find and click on the ‘Accounts’ tab. Sometimes, this tab might be labeled as ‘Accounts and Import.’

Source
Step 4. Select the 'Add another account' option
Scroll down until you see the ‘Grant access to your account’ section. Click on ‘Add another account’ to enter your assistant’s email address.
You can add up to ten delegates, or up to 25 if you have a business account.
Here, you can also choose an option as per your personal preferences:
- Mark messages as read when opened by your Assistant
- Leave messages unread when opened by your Assistant
Source
Step 5. Enter your assistant's email address
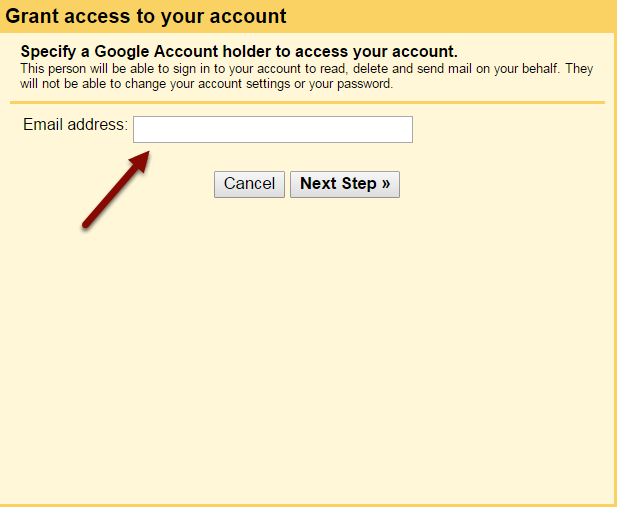
A dialog box will pop up asking for your assistant’s email address. Enter it and click ‘Next.’
Remember, you can only delegate to a Google email address (@gmail.com) if you’re using a @gmail.com account.
Source
Step 6. Click 'Send email to grant access'
Double-check the email address you’ve entered. If it’s correct, click ‘Send’ to grant access to your assistant.
Step 7. Your assistant confirms the request
Once you've completed all these steps, your virtual assistant will only have access to your email once they’ve confirmed the delegation request. It might take up to 24 hours for the changes to take effect.
How to revoke access
If you need to revoke access for your delegate in Gmail—maybe because you’re switching assistants or no longer need their help—don’t worry, it’s pretty straightforward to do so.
Here’s how:
- Click on the gear icon to open 'Settings'
Start by clicking the gear icon in the top right corner to open your Gmail settings.
- Go to the 'Accounts' tab
Next, click on the ‘Accounts’ tab (or it might say ‘Accounts and Import’).
- Remove delegate access
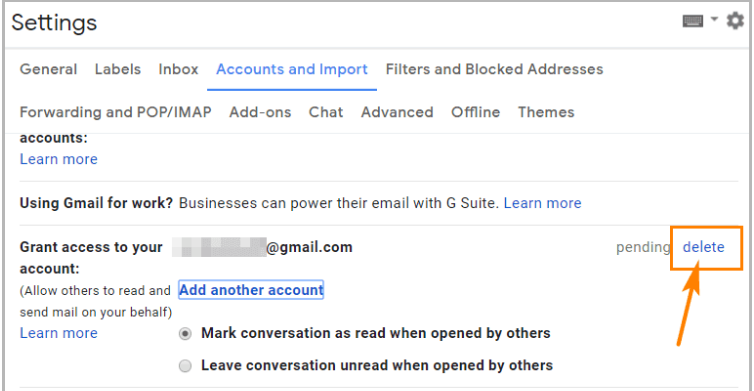
Find the ‘Grant access to your account’ section. On the right side, click ‘Delete’ next to the account you want to remove. This will stop that delegate from accessing your inbox.
Source
And that’s it! You’ve successfully updated your delegate access.
How to grant delegate access to your Outlook account
If you’re looking to get some help managing your business emails with Outlook, you can easily set up delegate access. This allows your assistant to handle emails on your behalf, whether it’s reading, responding, or sending them. Outlook also gives options to configure access permissions to limit access and functionality.
Here’s what you can choose from:
- Reading emails only
- Reading and responding to mails
- Sending mails only
- Full control over your inbox.
Once you set up the permissions, you may need to wait for about 60 minutes for the changes to take effect.
If you need to grant access to multiple users, you might want to consider creating a shared inbox in Office 365.
Remember, both you and your virtual assistant need to be using the same version of Outlook to complete this setup.
Follow the steps below to set up outlook 365 office access permissions;
- Open Microsoft Outlook
- Go to 'Account Settings'
- Click 'Add'
- Find your assistant
- Set permissions
- Decide on meeting-related emails
- Notify your assistant
- Allow access to private items (Optional)
- Click OK
Step 1. Open Microsoft Outlook
Launch your Microsoft Outlook application.
Step 2. Go to 'Account Settings'
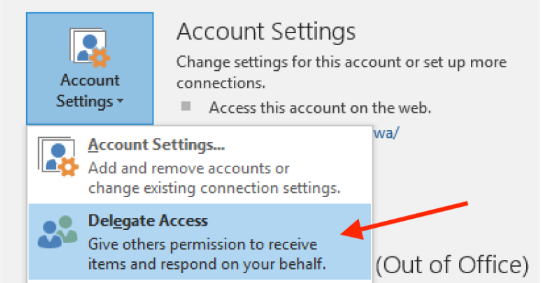
Click on the ‘File’ menu in the top left corner. From there, select ‘Account Settings,’ and then choose ‘Delegate Access.’
Source
Step 3. Click 'Add'
In the Delegates window that appears, click ‘Add.’

Source
Step 4. Find your assistant
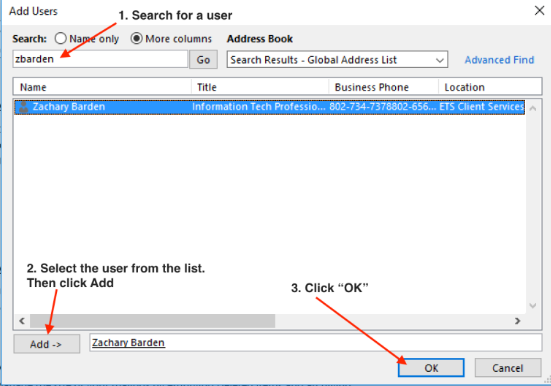
Type your assistant’s name into the search field or find them in the list. Once you’ve located their name, click ‘Add’ and then ‘OK’ to continue.
Source
Step 5. Set permissions
In the ‘Delegate Permissions’ window, you can configure what your assistant can do. You can choose from four permission levels: Editor (recommended), Author, Reviewer, or None.
The Editor level allows your assistant to read, create, and modify items in your inbox, calendar, tasks, contacts, and notes.

Source
Step 6. Decide on meeting-related emails
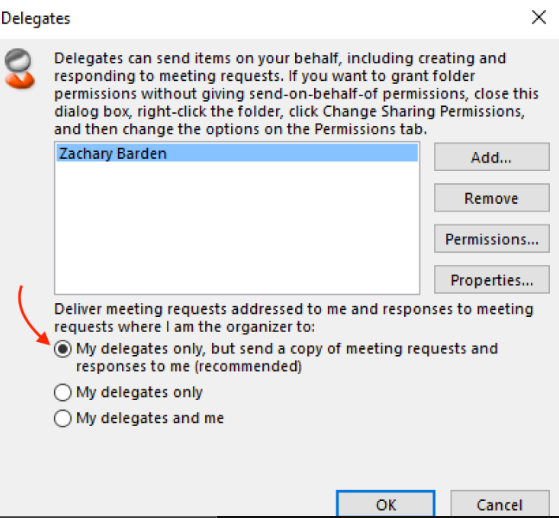
Choose how you’d like your assistant to handle meeting-related emails. It’s a good idea to let them receive meeting invites while still getting your own copy.
Source
Step 7. Notify your assistant
Check the box for ‘Automatically Send a message to delegate summarizing these permissions.’ This will send a notification to your assistant about their new access.
Step 8. Allow access to private items (Optional)
If you’d like your assistant to see your private items, such as meeting requests and responses, check the box for ‘Delegate can see my private items.’ Make sure you’ve given them Editor permissions for this to work.
Step 9. Click OK
Finally, click ‘OK’ to grant delegate access to your assistant.
And that’s it! Your virtual assistant now has the access they need to help you manage your Outlook account.
How to grant access to private items in your Outlook accounts
Want to let your assistant access your private items in Outlook? It’s easy to set up. Just follow these friendly steps:
- Go to the 'File' tab
Start by opening your Outlook application and clicking on the ‘File’ tab in the top left corner.
- Select 'Account Settings' and 'Delegate Access'
From there, choose ‘Account Settings,’ and then click on ‘Delegate Access.’
- Adjust permissions for your assistant
Find your assistant’s name in the list and click on it. Then, hit ‘Permissions.’
- Allow access to private items
Check the box that says ‘Delegate can see my private items.’ This will grant your assistant access to your private calendar entries and other personal items.
- Keep some information private
If there’s anything you’d like to keep hidden from your assistant, you can mark it as private. Just open each personal item, go to the Tags group, and click ‘Private.’
And you’re all set! Your assistant will now have the access they need while keeping your personal information secure.
How to change permissions for a delegate in Outlook
Need to update your assistant’s permissions in Outlook? No problem! Just follow these easy steps:
- Open the 'File' tab
Click on the ‘File’ tab in your Outlook application.
- Go to 'Account Settings' and 'Delegate Access'
Select ‘Account Settings,’ then choose ‘Delegate Access.’
- Select the assistant
Find your assistant’s name in the list and click on it, then hit ‘Permissions.’
- Adjust permissions
Update the permissions for the Outlook folders your assistant has access to as needed.
- Notify your assistant
To let your virtual assistant know about the changes, check the box for ‘Automatically send a message to delegate summarizing these permissions.’ This will keep them informed of the updates.
- Remove all delegate access (If needed)
If you want to remove all delegate access, simply click on the ‘Remove’ option in the Delegate Access section and skip the rest of the steps.
And that’s it! You’ve successfully adjusted the permissions for your delegate.
What's the bottom line?
Delegating your email management isn’t just about getting rid of a task—it’s about reclaiming your time, your focus, and your peace of mind.
So, why not start today?
At Time etc, we know just how precious your time and resources are, so speak to our expert team and we'll take care of the rest!
Or, you can answer a few simple questions to get personalized task recommendations tailored to your unique needs (as well as $150 off your first month of virtual assistant support with Time etc!)
Sources:

